What is a paint correction?
Paint correction is a professional detailing process that removes surface imperfections such as swirl marks, fine scratches, water spots, and oxidation from a vehicle’s clear coat. This technique helps restore a glossy, mirror-like finish by refining the paint surface—without repainting.
The process involves using a machine polisher and abrasive compounds to level out imperfections. Instead of covering scratches, paint correction removes them by carefully shaving down the surrounding clear coat. This evens out the surface, allowing light to reflect more uniformly—making scratches much less visible or disappear completely.
Why You Should Be Cautious With Paint Correction
While paint correction is highly effective, it’s important to avoid over-polishing. Every time you use compound or polish, a small layer of clear coat is removed. Attempting to eliminate every single scratch—especially deeper ones—can thin the clear coat too much in one area.
A compromised clear coat can no longer protect your vehicle’s paint from UV rays, moisture, road salt, and contaminants. Over time, this can lead to fading, oxidation, peeling, and costly repairs. Once the clear coat is gone, repainting is the only fix—and color-matching the original finish isn’t always perfect.
Tip: Aim to remove most swirl marks and minor scratches, and simply reduce the visibility of deeper ones. A well-done paint correction should enhance appearance without compromising your car’s long-term protection.
What Is A One-Step Paint Correction?
One-step paint correction is a streamlined polishing process that uses a single polish and pad combination to remove light to moderate paint imperfections and boost paint gloss in a single pass. It’s designed to correct swirl marks, light scratches, mild oxidation, and dull paint—without needing a separate compounding stage.
This approach is ideal for newer cars or well-maintained paint, where only light correction is needed. It’s also commonly used to prep paint before applying ceramic coatings or paint sealants, as it enhances clarity while preserving the clear coat.
One-step paint correction is perfect when the goal is paint enhancement over perfection—offering a balanced solution that improves appearance while protecting long-term paint health.
What Is a Two-Step Paint Correction?
In contrast, two-step paint correction is a more aggressive detailing method. It includes two stages:
1.A cutting stage using a compound and cutting pad to remove heavy swirl marks, deep scratches, and oxidation.
2.A polishing stage to refine the finish, remove micro-marring, and restore a glossy, mirror-like shine.
This method is ideal for older vehicles, neglected paint, or car owners looking for near-perfect paint correction results. However, it removes more clear coat and should be used carefully to preserve paint longevity.
Why the Second Step (Polishing) Matters
Skipping the polishing step after compounding is a common mistake. Compounding leaves micro-marring and haze, which dulls the paint surface. Polishing smooths out these fine marks, restoring maximum clarity, depth, and shine. Without polishing, the paint may look unfinished—even if most defects are removed.
When should I perform a paint correction?
Before Applying Paint Protection (MOST IMPORTANT)
If you’re planning to apply a ceramic coating, sealant, or PPF, it’s extremely important to correct the paint first to ensure maximum gloss and bonding.
A paint correction is the only way to truly ensure there is nothing left on your paint prior to applying your chosen form of protection
Visible Surface Imperfections Appear (Optional)
Swirl marks or spider webbing (common after improper washing)
Light to moderate scratches
Oxidation or fading paint
Water spots or etching from bird droppings and tree sap
Loss of gloss and depth in the paint
After Years of Neglect or Harsh Use (Optional)
If your vehicle has gone without regular detailing or has been exposed to the elements (sun, salt, snow, dirt) for extended periods.

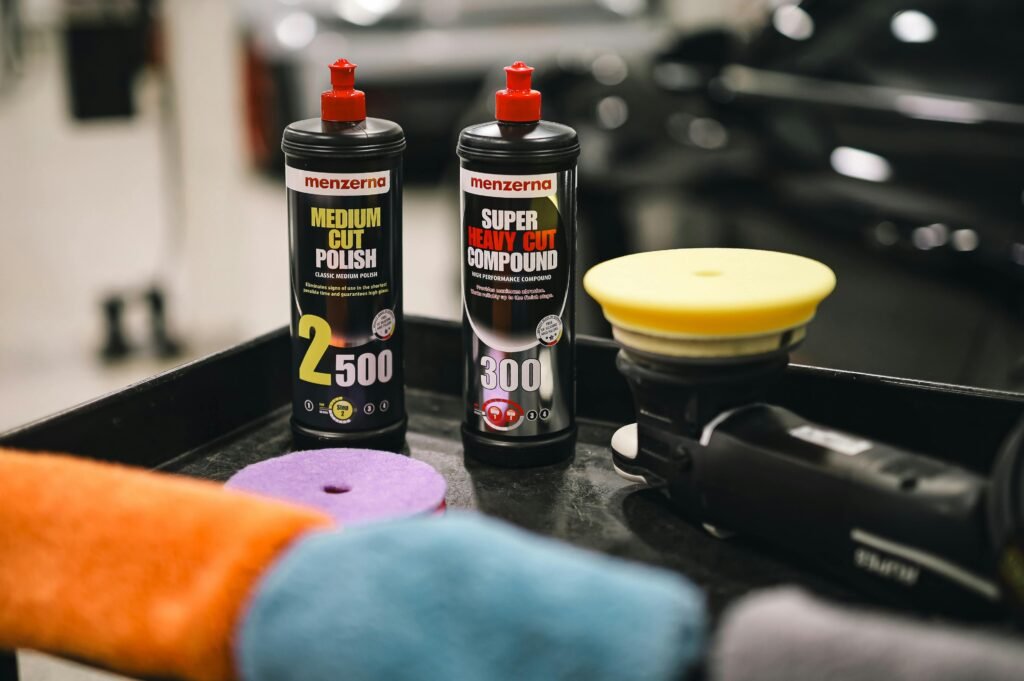
What tools will I need?
Machine & Pads
Dual Action (DA) polisher
Extension cord (recommended)
Cutting pads (foam, microfiber, or wool)
Polishing pads
3–6 pads of each type to rotate and clean between sections (may vary per vehicle size)
Products
Compound
Polish
Isopropyl alcohol (IPA) or panel wipe
Microfiber towels (multiple)
Protection & Accessories
Masking tape (for trim and sensitive areas)
Pad cleaning brush
Nitrile gloves
Detailing or inspection light
How To Perform A One-Step Correction
Steps:
- Wash the car thoroughly
- Chemically and mechanically decontaminate the paint
- Dry the car thoroughly
- Wipe down the car with a trusted brands panel prep
- Begin polishing
- Wipe down each section with panel prep once completed and inspect paint
- Final panel prep wipe down once finished
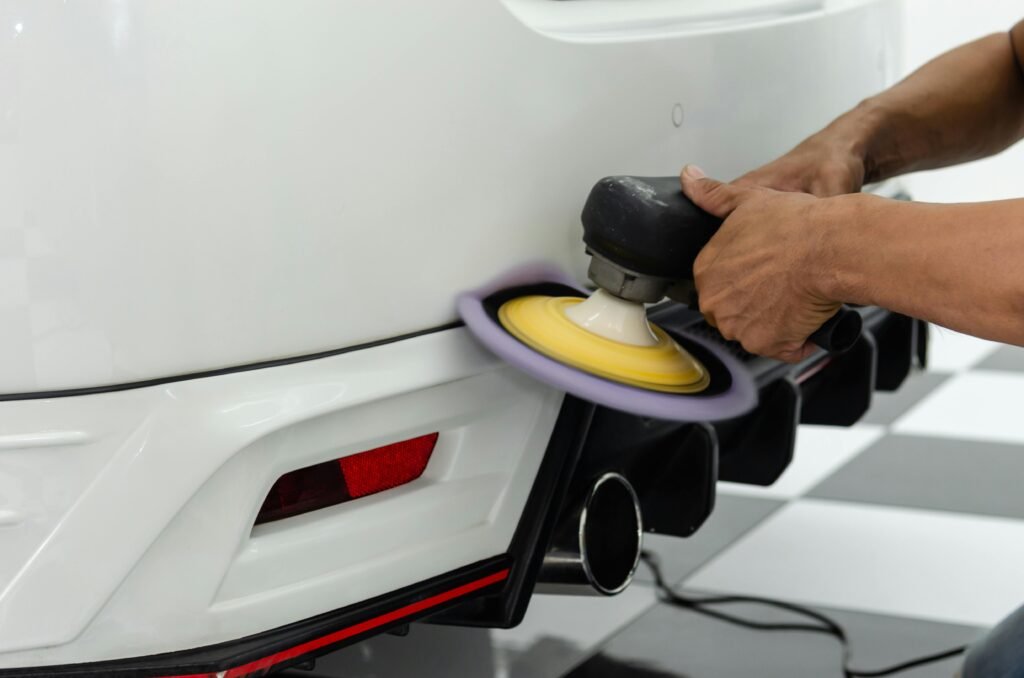
How Do I Actually Polish The Paint?
1. Choose the Right Polish and Pad Combo
Start by selecting a finishing polish if your car has light swirl marks or surface haze. For deeper defects, choose a heavier-cut compound or polish. Match your polish with a suitable foam or microfiber polishing pad, depending on paint hardness and the level of correction needed.
2. Prime the Polishing Pad
Apply a liberal amount of polish to the pad and spread it evenly—just like peanut butter on toast. Priming the pad helps prevent dry buffing and ensures the product is evenly distributed across the surface.
3. Work in 2’x2’ Sections
Divide the car’s surface into 2-foot by 2-foot sections. This allows better control, even pressure, and consistent correction.
4. Apply the Polish
Spray your working section with a panel prep solution to remove contaminants or oils. Then, add 3–4 pea-sized drops of polish to your primed pad. With the machine off, dab the pad across the section to distribute product. Once evenly spread, turn the DA polisher on at low speed and spread the polish across the section.
5. Polish the Paint Using Proper Technique
Set the DA polisher to a medium speed setting (4–5). Apply light, even pressure and move the machine in a crosshatch pattern, overlapping each pass by 50%. Continue polishing until the product becomes clear or begins to break down.
•🔄 One pass = one vertical or horizontal coverage of a section
•✅ One cycle = a full vertical + horizontal pass over a section
•For light defects, 1–3 cycles per section are typically sufficient
6. Remove Polish Residue
After each section, wipe away the remaining polish with a clean microfiber towel. Follow up with a panel wipe to eliminate any leftover oils or residue.
7. Repeat or Adjust as Needed
If you still see swirls or defects, repeat the process or switch to a more aggressive polish/pad combo. Otherwise, move on to the next panel.
💡 Tip: Clean your pads after every section and replace them every 1–2 panels for best results.
8. Inspect Under Proper Lighting
Use a detailing inspection light or check the paint under natural sunlight to confirm that the surface is swirl-free, glossy, and evenly polished.
How To Perform A Two-Step Correction
Steps:
- Wash the car thoroughly
- Chemically and mechanically decontaminate the paint
- Dry the car thoroughly
- Wipe down the car with a trusted brand’s panel prep
- Begin compounding
- Wipe down each section with panel prep & inspect paint
- If happy with results, move on to polishing
- Final panel prep wipe down
How Do I Actually Compound The Paint?
1. Choose the Correct Compound and Cutting Pad
Start by researching what level of cutting compound your vehicle’s paint requires. Choose a heavier-cut compound for deeper defects and match it with a foam or microfiber cutting pad designed for aggressive paint correction.
2. Prime the Pad Properly
Apply a generous amount of compound to the pad and spread it evenly—similar to how you’d spread peanut butter on bread. Priming the pad ensures even distribution and helps prevent dry buffing, which can cause micro-marring.
3. Work in Manageable Sections (2’x2’)
Divide the surface into 2-foot by 2-foot sections to maintain even pressure and control. This targeted approach is essential for consistent and effective paint correction.
4. Apply the Product Correctly
Spray the area with a panel prep solution to clean the surface before compounding. Add 3–4 pea-sized drops of compound to your already-primed pad. With the machine off, dab the pad around the 2’x2’ section. Turn the DA polisher on at low speed to spread the product evenly before beginning your working passes.
5. Compound the Paint for Defect Removal
Set your dual-action polisher to a medium-high speed (4–5). Apply light to moderate pressure and polish in a crosshatch pattern, overlapping each pass by about 50%. Continue compounding until the product turns clear or begins to break down.
•🔁 One pass = a full vertical or horizontal pass
•🔄 One cycle = both vertical and horizontal passes over the same area
•For effective correction, perform 2–6 cycles depending on defect severity
6. Remove Compound Residue
After compounding each section, use a clean edgeless microfiber towel to remove residue. For best results, follow up with panel prep to eliminate any oils or leftover product before inspecting.
7. Repeat or Adjust if Necessary
If paint defects remain, repeat the process or switch to a more aggressive pad and compound combo. Otherwise, move on to the next section. Always clean your pads after every section and consider replacing them every 1–2 panels to maintain performance.
8. Inspect with Proper Lighting
Use a high-quality detailing inspection light or examine the paint in direct sunlight to ensure that all swirls, scratches, and imperfections have been properly removed during the compounding stage.
FINAL THOUGHTS
Is Paint Correction Worth It?
Paint correction is one of the most transformative detailing services you can perform on your vehicle. Whether you’re removing years of swirl marks or prepping for ceramic coating, proper correction restores clarity, gloss, and depth like nothing else.
While powerful, it’s important to approach paint correction with care. Over-polishing can damage the clear coat, so always match your method to your paint’s condition—whether it’s a quick one-step polish or a full two-step correction.
When done correctly, paint correction not only improves your car’s appearance but also enhances the effectiveness of paint protection products like ceramic coatings or sealants. By understanding the process, using the right tools, and working patiently, you can achieve professional-level results at home.